Mikey and I have been making some pretty decent progress over the past 10 days. It is SO NICE to have weather again that doesn’t freeze your fingers off if you try to do anything outside - or even indoors in our unheated garage and workshop or inside the Tiny House itself!
Doors and Trim
A lot of time and meticulous effort was needed to complete the two door installations. We knew that one of the rough openings - the one for the back door directly into the living area - was a little out of square, so careful positioning would be needed to ensure the door frame itself remained square as it was fastened into place.
Mikey spent considerable time trying to decipher the instructions that came with the doors; ultimately we followed them as best we could - but with some “seat of the pants” technique.
I missed the heavy lifting part where he initially moved the rear door assembly into the opening. Following that, he worked on the inside and I on the outside. The threshold of the door did not require shims - it simply rested flat on the subfloor plywood, with a “sill pan” made of flashing tape and a back dam created by a strip of weatherstripping to prevent any water intrusion. On each side of the door frame, shims (two very acute-angled, long and narrow triangles of wood slid alongside of each other to provide infinitely adjustable thickness) were placed between the door jambs and the sides of the rough opening, near the levels of the two door hinges.
My job was mainly to monitor the outside surface of the doorframe and ensure it was held flush with the exterior wall sheathing surface - particularly when Mikey drilled holes for attachment screws and drove the screws horizontally through the door jambs and shims and into the house 2x4 framing. As screws were driven in, we would check that the door itself could open and close securely but without binding anywhere on the door frame. Screws were driven into the door threshold also, but none were required along the top lintel.
Each door came with cutouts for two sets of locking hardware - a service passage handle set and a deadbolt locking set. The hardware had been mounted in the door itself before it was fastened in the rough opening; however, the striker plates for the deadbolt had not yet been installed. On one of the doors, the cutout for the plate was the wrong size. On the other, the door manufacturer had forgotten about the cutout and deadbolt hole entirely!
This meant it was time to break out the hammer and chisel. Each plate was positioned on the door jamb surface and traced carefully with a utility knife; then the painstaking work of cutting a recessed space exactly the right depth and shape for each plate was performed with a wood chisel. Also, an actual hole in the wood of the jamb had to be made neatly to receive the latch and the deadbolt where they passed through their striker plates.
With both doors in place at last, the Tiny House could be locked up for the first time securely in our absence.
Before we could get to a greatly anticipated milestone - putting cedar siding up (‼️) - there were next several pieces of dark colored mahogany trim board which had to be fastened in place along the edges of the sides and trailer tongue end of the house. This clearly required both of us, and in the case of trim along the roof line, the use of our dandy new and fairly light 10’ Werner aluminum stepladder ($127 at Home Depot) - for me to stand on while holding my end of each long board in place.
The boards were fastened in with dainty, stainless trim screws. They had each been measured, cut and painted well beforehand; and the ones along the roof edges required router cuts on their bottom edges to provide a shallow recessed space behind them for the highest rows of cedar siding to fit underneath.
Cedar siding
With the windows, doors, and trim in place, we could next get started putting up the gorgeous pieces of cedar siding and beginning to see the Tiny House as Mikey had long envisioned it with his laptop’s imaging features.
The task of staining the (approximately) 930 linear feet of 8-inch wide siding pieces fell to me. About 30% of this work I had done outdoors on sawhorses during nice weather last fall; and during the week of April 23 - 29, I completed the remaining pieces during the day while Michael was at work. They ranged in length from 7 to 16 feet. We had found that a 1/2” diameter paint roller - 4” wide - did the job beautifully and rapidly (having struggled slowly before that with a brush). Each board came with one rough side and one finished side, and the thickly-napped roller was essential to get stain into the fine recesses of grain on the rough sides. I stained the rough sides first, then flipped each board over to complete the smooth side; in that way the freshly stained smooth sides never rested directly on my sawhorses (which might have marred their appearance). Care was also required to make sure each edge and each open-grained end was stained with the roller also.
We approached the actual siding installation with both eagerness and some trepidation! The different lengths of boards each had their own distinct lighter and darker color patterns and beautiful grains, and we didn’t want to make any serious mistakes in positioning them on the wall sheathing.
Mikey decided quite early to use his stainless finish screws rather than nails - a choice which we came to believe would provide several advantages - even though saving money was not one of them. In particular, it would be possible to remove boards later when certain openings for vents would have to be made, and if a board was ever damaged it could be replaced most easily.
Whether the applicable “how to” literature says so or not, we could see that some comprehensive, overall planning of how the siding boards would be laid out ALL around the Tiny House would be required before getting started. We didn’t want to find ourselves facing a situation where a row of siding just a flimsy 1/2” high or less might have to be placed directly above or below a window or door. As things happened, this planning process turned out to be much simpler and faster than we might have anticipated!
First, we went all around the structure and measured the height of each window and door at its top and bottom. Mikey had designed the heights of the tops of at least three major fixtures to be the same, so we decided to make that level correspond to the bottom edge of a row of boards that would be at the same level all around the house (except for the hitch end bathroom wall, where there would be metal siding and not wood). The bottom-most course of siding would rest on a common baseline - the top of the dark mahogany trim boards all around.
Mikey knew that the recommended overlap of each course of siding was between 1” and 1.5”, which would leave about 6” of “exposure” - the height of each board exposed “to the weather.” We then divided (by 6 inches) the measured distance from the top of the base trim to the level where we wanted the bottom of a specific row to cross directly above the three fixtures mentioned earlier - to give us a good idea of the number of courses of siding we would have to apply over that vertical distance.
Amazingly enough, the quotient of that division came out to be just slightly greater than thirteen (13). So… we reasoned that we could make that number of courses be exactly 13 if we simply allowed our estimated exposure height of each course to exceed 6” by a small fraction. We divided the overall height again - this time by 13 - and got a calculated exposure height of about 6.16” per row. Mikey found a very useful online conversion tool which can convert decimal inches into mixed numbers with fractions (rounding to the nearest 1/16”), so our chosen exposure height worked out to 6 1/8”.
So…. it then seemed that our siding exposure height was ideally determined for the entire house … however, we then took a further step of checking exactly how all the courses of siding would lay out everywhere (including other openings that did not figure into our exposure determination), if we went ahead with an exposure of 6 1/8”. Again - amazingly - it turned out that the tops and bottoms of all remaining windows and doors would fall somewhere close to the vertical middle of a course of siding and not just close by some awkward fraction of an inch. These instances could be fairly easily accommodated by “notching” a course of siding.
Thus a hefty burden was lifted from our minds, as we could now proceed enthusiastically to install siding, without fear of some unforeseen problem after a lot of siding had already been attached! And - as a small bonus - the overlap between courses that would result from our calculated exposure height turned out to be exactly half way between the min and max recommended for an overlap.
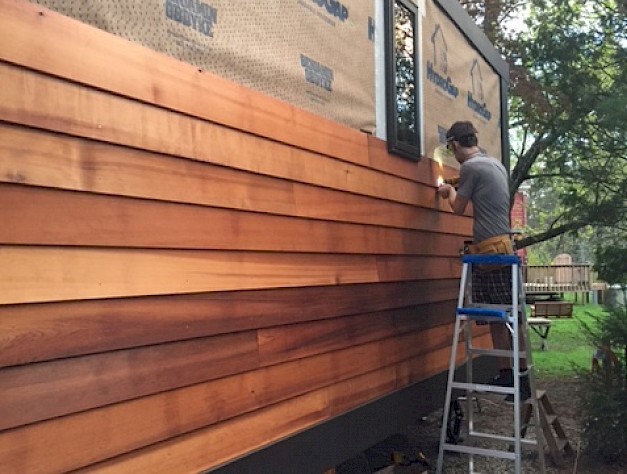
Details of the installation will appear in a following post. For now, this is what our progress looks like so far, including the notching of one course around the bottom of the kitchen window…

Comments: 1 Comment
Comment
Comment by Paul MacBain on 29 September 2021 2:07 am
GET PROFESSIONALLY VIDEOS AT AFFORDABLE PRICES
We offer professionally produced videos at affordable prices.
Our videos have the look and feel of a high quality television commercial, complete with professional spokesperson, background, text,
images, logos, music and of course, most importantly, your company’s contact information for your process.house.
If you’re ready to reach more clients today, let us get to work on producing your company’s exclusive video.
MORE INFO=> http://qejn39630.bloggerbags.com/8235143/get-videos-at-affordable-prices
Post a comment